Grainy pictures are a part of every photographers life. Every now and then you will face a situation where you will end up having grainy photos.
New photographers, especially with entry level cameras and kit lenses face this problem a lot , they always wonder why are my pictures so grainy ? . This is due to the limitation from their gear as well lack of knowledge about the subject.
In this post we will see what causes grainy pictures ? How to avoid taking one and in case you cant avoid how to fix a grainy picture in post processing.
What causes grainy pictures ? What is grain ?
Before we get into the details of grainy pictures and reasons behind it , lets understand a bit more about how digital cameras capture the image.
A DSLR or a Mirrorless camera has an image sensor. The light coming from the lens falls on the sensor and sensor captures it for us and stores it to a digital media drive as an image.
Shutter speed , ISO and Aperture form the exposure triangle and these together decide how much light is going to fall on sensor and for how much time.
There are many things that can cause grainy photos such as incorrect ISO , long shutter speeds , less ight in the scene , bad quality or small camera sensor and so on. we will take a look at all of them one by one.
But before that we must understand what is grain or what is the noise that is spoiling our image. There are two main image noise types which make our image look grainy.
Luminance noise
Luminance noise is the one which only affects the brightness of the pixels and not the color. This generally happens when there is lack of light in the image and sensor tries to get the maximum out of the given situation.
This ends up in a random variation of very bright pixels all over the image. Luminance noise is the most common noise type in digital photography especially in low light and high ISO situations.
Luminance noise is more prominent in low budget entry level cameras , mobile cameras and point and shoot cameras due to shear lack of capability of the sensor and the image processor.
Luminance noise is easy to identify and correct in post processing.
Color noise or chrominance noise
Color or chrominance noise is the random variation of colored pixels in the image compared to the original intended colors. Here the brightness is consistent but you can see a sprinkle of random color pixels throughout the image.
Color or chrominance noise is associated with sensor heating and is very normal to appear in long exposure photography.
This type of noise is hard to identify and correct. However with advance postprocessing tools it can be taken care of.
Main reasons for grainy photos
As we saw above, the reasons for luminance and color noise are a little different but generally it all boils down to lack of light in the scene and associated effects.
Lets see some of the main reasons for grainy images.
High ISO noise in images
ISO and noise have a direct relationship with each other. This basically means that as the ISO number increases the noise in the image increase. Most cameras have a threshold beyond which the noise increase dramatically.
ISO number is used to define the sensitivity to the light. Higher the ISO more the sensor becomes sensitive to light.
High ISO in low light conditions produces noise and grain in darker areas of the image. Shadow and dark regions of the image show both luminance and color noise.
Most entry level cameras have a decent noise performance upto 800-1600 iOS range , beyond this point the images become too grainy and are not usable.
Advanced cameras and especially full frame cameras have significantly better noise performance at higher ISO levels. They can easily give decent images till 4000 – 8000 ISO.
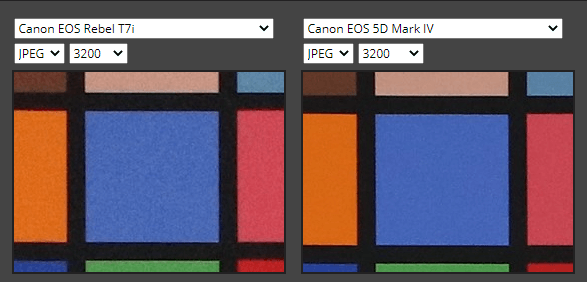
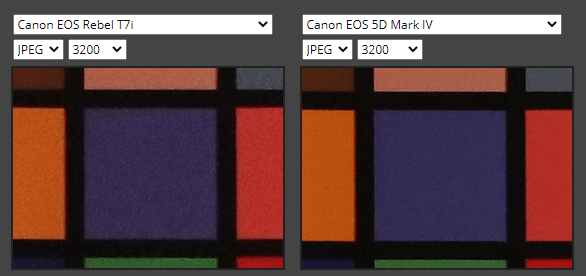
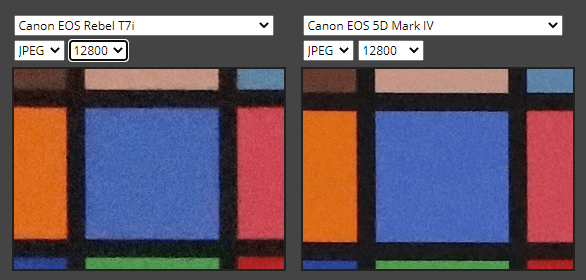
Here is an example of ISO performance of a entry level and pro camera.
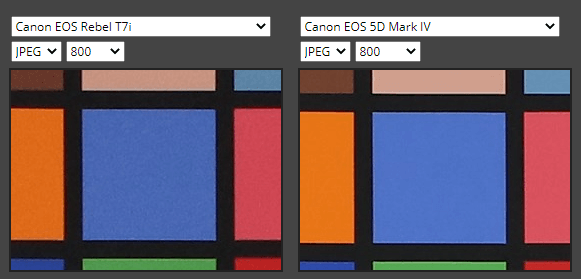
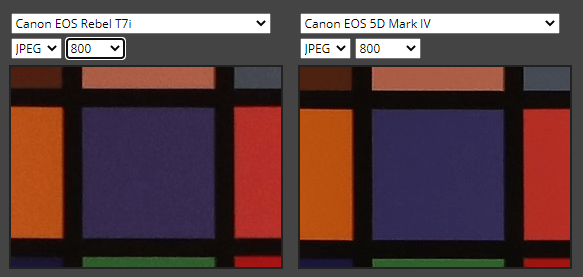
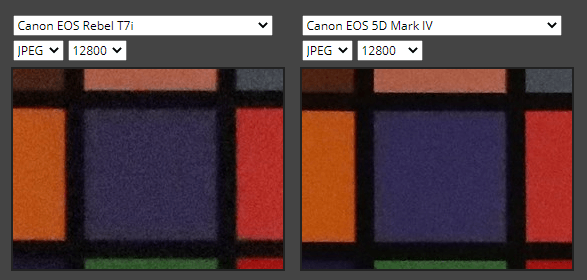
From above images it can be clearly seen that T7i which is consumer grade camera performs well at 800 ISO and normal lighting situation. For low light even at 800 ISO we can see 5D Mark IV performing better than T7i.
The difference is more visible at higher ISO and lower light situations. 5D Mark IV performs much better at lower light and high ISO. AT 12800 ISO T7i images has a lot of luminance noise and is not usable.
One can also use a fast prime lens to get widest possible aperture. This will help to operate at low ISO and avoid noise.
Grainy images due to Under Exposure
Under exposure is one of the main reasons for having noise in images. Under exposed images in shadow and dark regions show significant.
Many a times photographers face challenging situations where same scene has both dark and bright areas in the frame. The camera exposes to get the mid-tones right and in turn can under or overexpose the image based on what metering mode is selected.
Dark areas in underexposed images have weird luminance and chrominance noise which is difficult to get rid of. This noise also exaggerates further during post processing.
Noise due to Small or low quality sensor
Mobile cameras and point and shoot cameras generally have very poor low light capabilities. Night shots or in general low light shots can have a lot of noise in these images.
One can use manual mode , use a tripod and shoot at low ISO to try and take care of this. It is best to use at least a basic DSLR or if possible a full frame sensor for low light situations.
The image quality will be far better with bigger size and better quality sensors.
Grainy images in Long exposure photography
Long exposure photography is prone to grainy images and noise in the photographs. This is mainly due to the fact that the sensor heats up due to long exposure times and this introduces noise in images.
There are many advance techniques that can be used specific to night and long exposure photography, but that’s a topic for a separate discussion. In general , selecting the right combination of ISO and exposure time is crucial.
It may sound counter intuitive but sometimes selecting higher ISO and reducing exposure time actually helps.
Here is a great article about long exposure photography on bhphotovideo.
How to avoid grainy images ?
- To avoid high ISO noise in images is difficult in certain situations . Photographers should know what there camera is capable of in terms of ISO performance and what is the limit to which they can stretch their camera. Avoiding high ISO values beyond camera capability and maintaining decent light during shooting can help to avoid this noise.
- Whenever possible using high ISO capable full frame camera can help a lot to avoid noisy images.
- Using the lowest required ISO can significantly reduce the noise. Keeping ISO on auto mode with max ISO limiter is a great way to ensure noise free images. Most cameras thes days have this feature.
- Using in camera noise reduction can also be activated. Many cameras also have long exposure noise reduction ( LENR) feature which should be used for long exposure photography.
- Best way to tackle the underexposure noise situation is to overexpose a bit during shooting while avoiding highlight clipping. One can also use flash to fill in additional light or use a reflector to light the shadow regions.
- During post processing one can desaturate the shadow and dark regions before applying any color correction. This significantly reduces the noise introduced in these areas. One can also use de-noising techniques in Lightroom to take care of this.
- One can also shoot in RAW format which gives a lot of post processing capability and can significantly help to reduce the grainy pictures.
- In general selecting the right combination of ISO and shutter speed during long exposure photography can help to avoid noise.
How to fix grainy images in post processing ?
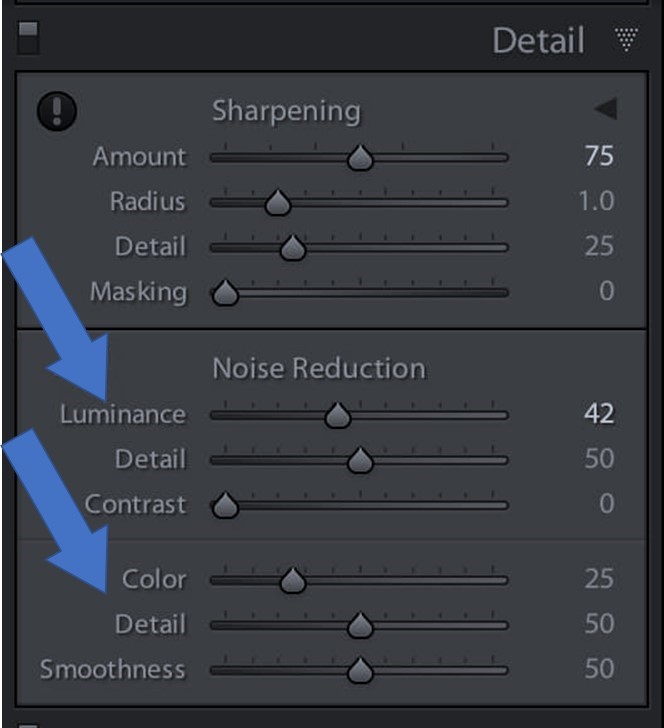
Both photoshop and Lightroom have noise reduction feature. Below snaps show the noise reduction windows in both photoshop and Lightroom. Both have features to reduce luminance and color noise.
Both have similar effects but the Lightroom version is easier to use. Here is a detailed article about using photoshop noise reduction feature.
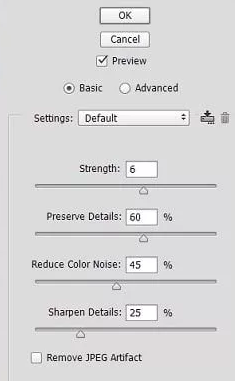
In case of Lightroom fixing noise is part of the workflow for most photographers. It also has a handy masking feature. With this you can restrict the noise reduction to areas which have flat colors and no edges in image. This helps to maintaining the sharpness of the image while reducing the noise.
Here are some great videos to use noise reduction feature in Lightroom and photoshop.
How to Fix Grainy Photos in Your iPhone or Android Phone
Both Android and iPhone have quick-fix options for grainy photos. These are great if you don’t want to spend the time or money of downloading and installing large software suites.
Lightroom Mobile
Lightroom for Mobile is also an option if you have Lightroom desktop edition installed on your computer.
The app is free for both Android and iOS users and includes a simple, but effective, graininess reduction tool.
The mobile version of Lightroom doesn’t have correction sliders for color noise and luminance, unlike the desktop edition.
A single slider adjusts the noise balance. You can also access additional editing tools within the app if you have Creative Cloud Photography.
Noiseware
Although the Noiseware app is only available for iOS, it has a professional level of noise reduction.
Noiseware is extremely simple to use. It offers three preset options to get rid of noise once it is installed: Strong, Weak, or Default.
It is a award-winning noise suppression software tool designed to decrease or eliminate noise from digital photo or scanned images.
You can also choose to reduce noise and balance for better detail preservation. Night Shot is a feature that fixes low-light photos.
Noise Reducer Pro
Noise Reducer Pro does exactly as its name suggests. It’s a fast and easy way to fix grainy photos. The app is available on both Android and iOS and also as a desktop app on windows machines. It’s simple to use and has three settings that address the problem of image noise.
You can use Noise Reducer by downloading the app to your iPhone/Android device. Once it is opened, you can select the image to be cleaned and then choose one of three noise reduction settings. These settings are called Light, Medium and Custom.
This allows you to adjust noise removal between a minimal and a high level. You can also compare the original and edited images side-by side to see exactly what you did.
Cheat sheet to avoid grainy pictures
| ISO | Use lowest ISO possible for the given situation. Test your camera and understand the ISO capability before field usage. Use auto ISO and limit max ISO to your camera capability. |
| Exposure | Overexpose the image , use correct metering mode to ensure less shadow and dark regions in photograph. |
| Use fill flash or reflectors | Use fill flash or reflectors to avoid very dark and lshadow areas in a high dynamic range scene. |
| In Camera Noise reduction | Use in camera noise reduction , especially long exposure noise redustion features. |
| Long exposure | Use lowest possible ISO and use stacking methods to avoid noise |
| Camera Sensor | Use full frame sensor for low light situations whenever possible. Avoid mobile and point and shoot cameras for night shooting. |
Summery
Noise can be a great deterrent to the appeal and image can have. Avoiding and fixing grainy images is an important tool in the arsenal of a photographer.
ISO is the main culprit along with sensor heating when it comes to high noise images. Learn to avoid them or fix them in post processing using software tools such as Adobe photoshop or Lightroom.